Relay Controller Components:
1. Momentary Push Button Switch 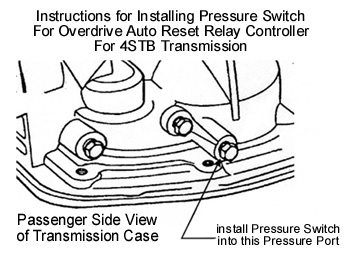
2. Relay Controller
3. Pressure switch
Wire Color Function
- (Blue)............................ Oil Pressure switch on side of trans (either terminal doesn't matter)
- (Red)............................. 12v+ switched from ignition (fused)
- (Black)........................... Ground
- (Yellow) ........................ to white wire on the driver's side at rear of transmission (overdrive solenoid)
- (White).......................... to O/D momentary button
- (Green).......................... to O/D momentary button ( White and Green are NOT polarity sensitive!!!)
NOTE: 1. Transmission case must be properly grounded for this system to operate correctly.
2. O/D switch can be any 2-prong single throw momentary switch. A regular on/off toggle switch will not work with this system.
Valve Body Removal General Instructions
for
4STB (AOD)
Its's really not that difficult a job to do as long as you have access to the underside of the car.
1. It involves first unbolting and removing the trans oil pan. A catch basin should be placed underneath to capture the trans fluid when the trans pan is removed. We generally loosen all of the bolts first, enough to just seperate the pan from the trans case. Because the pan flange usually sticks to the case, a screwdriver is used to pry it off slightly. Once it's seperated, we remove all of the bolts except 2 located together on one end of the pan. This will allow the pan to tilt in one direction and permit some of the fluid to drop off into the catch basin.
2. Once the pan is removed you'll see the cast aluminum valve body bolted directly to the underside of trans case. Please be aware that there are some electrical connections. Pull the wire connectors apart and not the wire to seperate them.
3. Remove oil filter by removing the 3 bolts.
4. Once the electrical wires are disconnected and the filter is removed you can proceed to remove each of the valve body bolts. The valve body is relatively light so once the last bolt is loosened it will start to seperate from the trans case. Remove the last bolt slowly and do not let it drop.
5. For convenience keep all of the hardware together for re-assembly.
6. Then wrap the valve body with rags and put it into a box (for shipping if necessary). Before sealing the box, please include all of your information so we know where it originated. When you're ready to ship just give us a call so we'll know it's on it's way.
If you run into any difficulties or have any questions please call.